Mastering Portrait Lighting Portrait photography is an art form where lighting plays a pivotal role. The delicate interplay between shadows and highlights can transform a simple image into a masterpiece, giving the subject depth, emotion, and personality. Understanding the nuances of portrait lighting isn’t merely about setting up lights; it’s about sculpting with light. Whether you’re a beginner learning the best portrait lighting setup for beginners or an expert refining your craft, mastering lighting will elevate your portraiture to new heights.
The Science of Light in Portraiture
Light behaves in complex ways when it interacts with your subject. It reflects, refracts, and scatters. The key to mastering portrait lighting lies in understanding how light sources behave in relation to the subject. Portrait lighting can be categorized into three broad types: natural, artificial, and mixed. Each has its unique characteristics, strengths, and challenges.
Natural Light in Portraiture: Harnessing the Elements

Natural light is the most accessible light source and often the most challenging to master due to its constantly changing nature. Learning how to master natural light in portraits is a fundamental skill for any photographer. The quality of natural light varies depending on the time of day, weather conditions, and even geographical location.
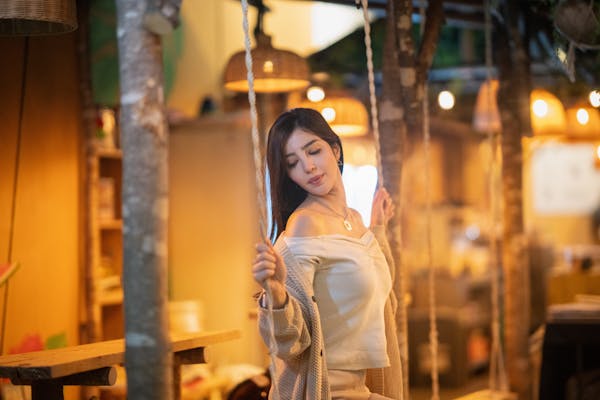
The golden hour—just after sunrise or before sunset—is often considered the best time for portrait photography because the light is soft, warm, and directional. During this time, shadows are less harsh, making it ideal for capturing flattering skin tones and soft textures. Midday sunlight, in contrast, can be harsh and unflattering due to its directness. However, diffusing this light by using objects like curtains, clouds, or reflectors can soften its intensity, creating a more desirable effect.
- Diffusion in natural light: Using diffusers like translucent reflectors or even natural elements like tree leaves to scatter and soften sunlight.
- Reflected natural light: Utilizing surfaces like walls or mirrors to bounce natural light onto your subject for a more controlled effect.
The Power of Studio Lighting Techniques
Studio lighting allows for total control over every aspect of the lighting environment. Unlike natural light, studio lights can be manipulated to achieve the exact look desired, regardless of time or weather. Mastering studio lighting techniques for portrait photography can lead to more predictable and artistic results.
Key lighting setups in a studio include:
- Three-point lighting: A classic setup consisting of a key light, fill light, and backlight. The key light is the primary light source, creating the main illumination on the subject. The fill light is used to soften shadows created by the key light, while the backlight adds separation between the subject and the background, adding depth.
- Rembrandt lighting: Named after the Dutch painter Rembrandt, this technique creates a small triangle of light on the shadowed side of the face. It’s a dramatic style of lighting that enhances the mood of the portrait.
- Butterfly lighting: This involves positioning the light source directly in front of and above the subject, creating a shadow under the nose resembling a butterfly. It’s a popular choice for glamour portraits because of its flattering effects on facial features.
Equipment Matters: Choosing the Right Gear
In the realm of portraiture, equipment plays a critical role in achieving the desired lighting effects. The best lighting equipment for portrait photography varies depending on your style, budget, and the kind of portraits you’re aiming to create.
- Softboxes: These are essential for diffusing light, creating a softer, more even illumination. They’re particularly useful for eliminating harsh shadows and are indispensable in portrait photography.
- Umbrellas: Lighting umbrellas come in two types—reflective and shoot-through. Reflective umbrellas bounce light back onto the subject, producing soft, broad lighting. Shoot-through umbrellas diffuse light through their fabric, resulting in a softer, more diffused glow.
- Ring lights: Popular in beauty and fashion photography, ring lights create an even light around the subject’s face and produce a distinctive catchlight in the eyes.
- Speedlights: These portable flashes can be used off-camera to create dynamic lighting setups. By using modifiers like softboxes or grids, you can shape the light from a speedlight to achieve studio-like results in any location.
Best Portrait Lighting Setup for Beginners: Simplicity is Key
For novice photographers, understanding the best portrait lighting setup for beginners can be daunting. A simple yet effective setup for beginners involves using natural light paired with a reflector. Placing the subject near a window, with the window acting as the primary light source and a reflector filling in shadows, is a straightforward way to achieve professional-looking results without complex equipment.
Another easy option for beginners is a single light setup, where one light source is used as the key light. Pair this with a reflector or fill light to manage shadows. As you gain confidence, you can introduce additional lights and experiment with more advanced techniques.
Shadows and Light: The Art of Contrast
Contrast is what gives a portrait its life. The balance between light and shadow can dramatically affect the mood of the image. High-key portraits use minimal shadows to create a bright, cheerful image, while low-key portraits use deep shadows and limited light to evoke mystery or emotion. Understanding the relationship between light and shadow and how to manipulate it will enable you to tell a story with each portrait.
High-Key Lighting: Bright and Airy
High-key lighting minimizes shadows and results in a soft, ethereal look. This lighting style is commonly used in commercial photography or portraits that aim to convey lightness, happiness, or simplicity. By using multiple light sources or large diffusers, you can create this style in both natural and studio settings.
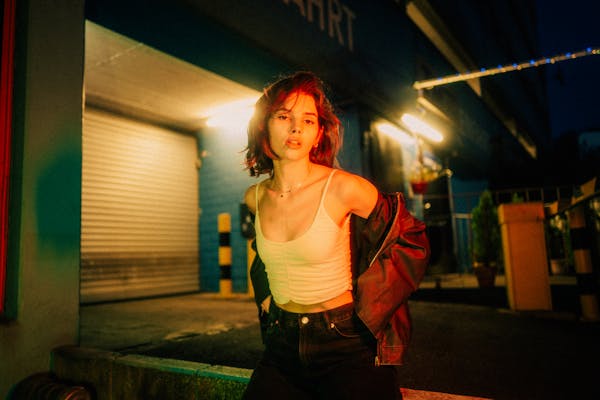
Low-Key Lighting: Moody and Dramatic
In contrast, low-key lighting focuses on the shadows. It’s often used in dramatic or artistic portraits to emphasize the subject’s features or create a somber mood. Using a single, directional light source, such as a spotlight or a gridded softbox, allows for precise control over where shadows fall.
The Role of Reflectors and Diffusers
Reflectors and diffusers are essential tools in portrait lighting, allowing you to manipulate natural or artificial light to your advantage. A reflector bounces light back onto the subject, softening shadows and creating a more balanced exposure. Silver, white, and gold reflectors each produce different effects—silver enhances contrast, white provides neutral reflection, and gold adds warmth.
Diffusers, on the other hand, scatter light, softening its harshness. In portrait photography, using a diffuser between your light source and your subject can eliminate harsh shadows and create a more flattering, even light.
Mastering Natural Light: Location and Timing
When learning how to master natural light in portraits, it’s essential to understand that location and timing are everything. For instance, open shade areas—such as under trees or building awnings—can provide soft, even light without the harshness of direct sunlight. Indoors, north-facing windows are ideal for portrait lighting as they provide consistent, soft light throughout the day.
Additionally, the time of day plays a crucial role in determining the quality of light. Early morning or late afternoon light tends to be softer and more diffused, offering more flattering results than harsh midday light.
Studio vs. Natural Light: The Eternal Debate
Choosing between natural and studio lighting often comes down to the look you want to achieve. While natural light can produce stunning results with minimal equipment, studio lighting offers complete control over every aspect of the light, from its intensity to its color temperature. Each has its place in portrait photography, and the best photographers know how to use both to their advantage.
Mastering studio lighting techniques for portrait photography allows for precision and repeatability, making it ideal for commercial or editorial shoots. However, the unpredictability and beauty of natural light can create truly unique and spontaneous portraits.
Read More: Street Photography Techniques
Conclusion: Mastering Portrait Lighting
Mastering Portrait Lighting is an evolving journey that combines technical skill with creative experimentation. Whether you’re working with the best portrait lighting setup for beginners or diving deep into studio lighting techniques for portrait photography, understanding light’s behavior will unlock new dimensions in your work. Embrace the tools and techniques at your disposal, and let your portraits become more than just photographs—they will become windows into the soul.