Mastering the Exposure Triangle: The Key to Captivating Photographs
Photography is a beautiful art form that allows us to capture moments and create stunning visual narratives. To truly excel in this craft, it is essential to understand the exposure triangle, a fundamental concept that governs the outcome of our photographs. In this article, we will explore the exposure triangle in detail and how mastering it can lead to captivating photographs.
What is the Exposure Triangle?
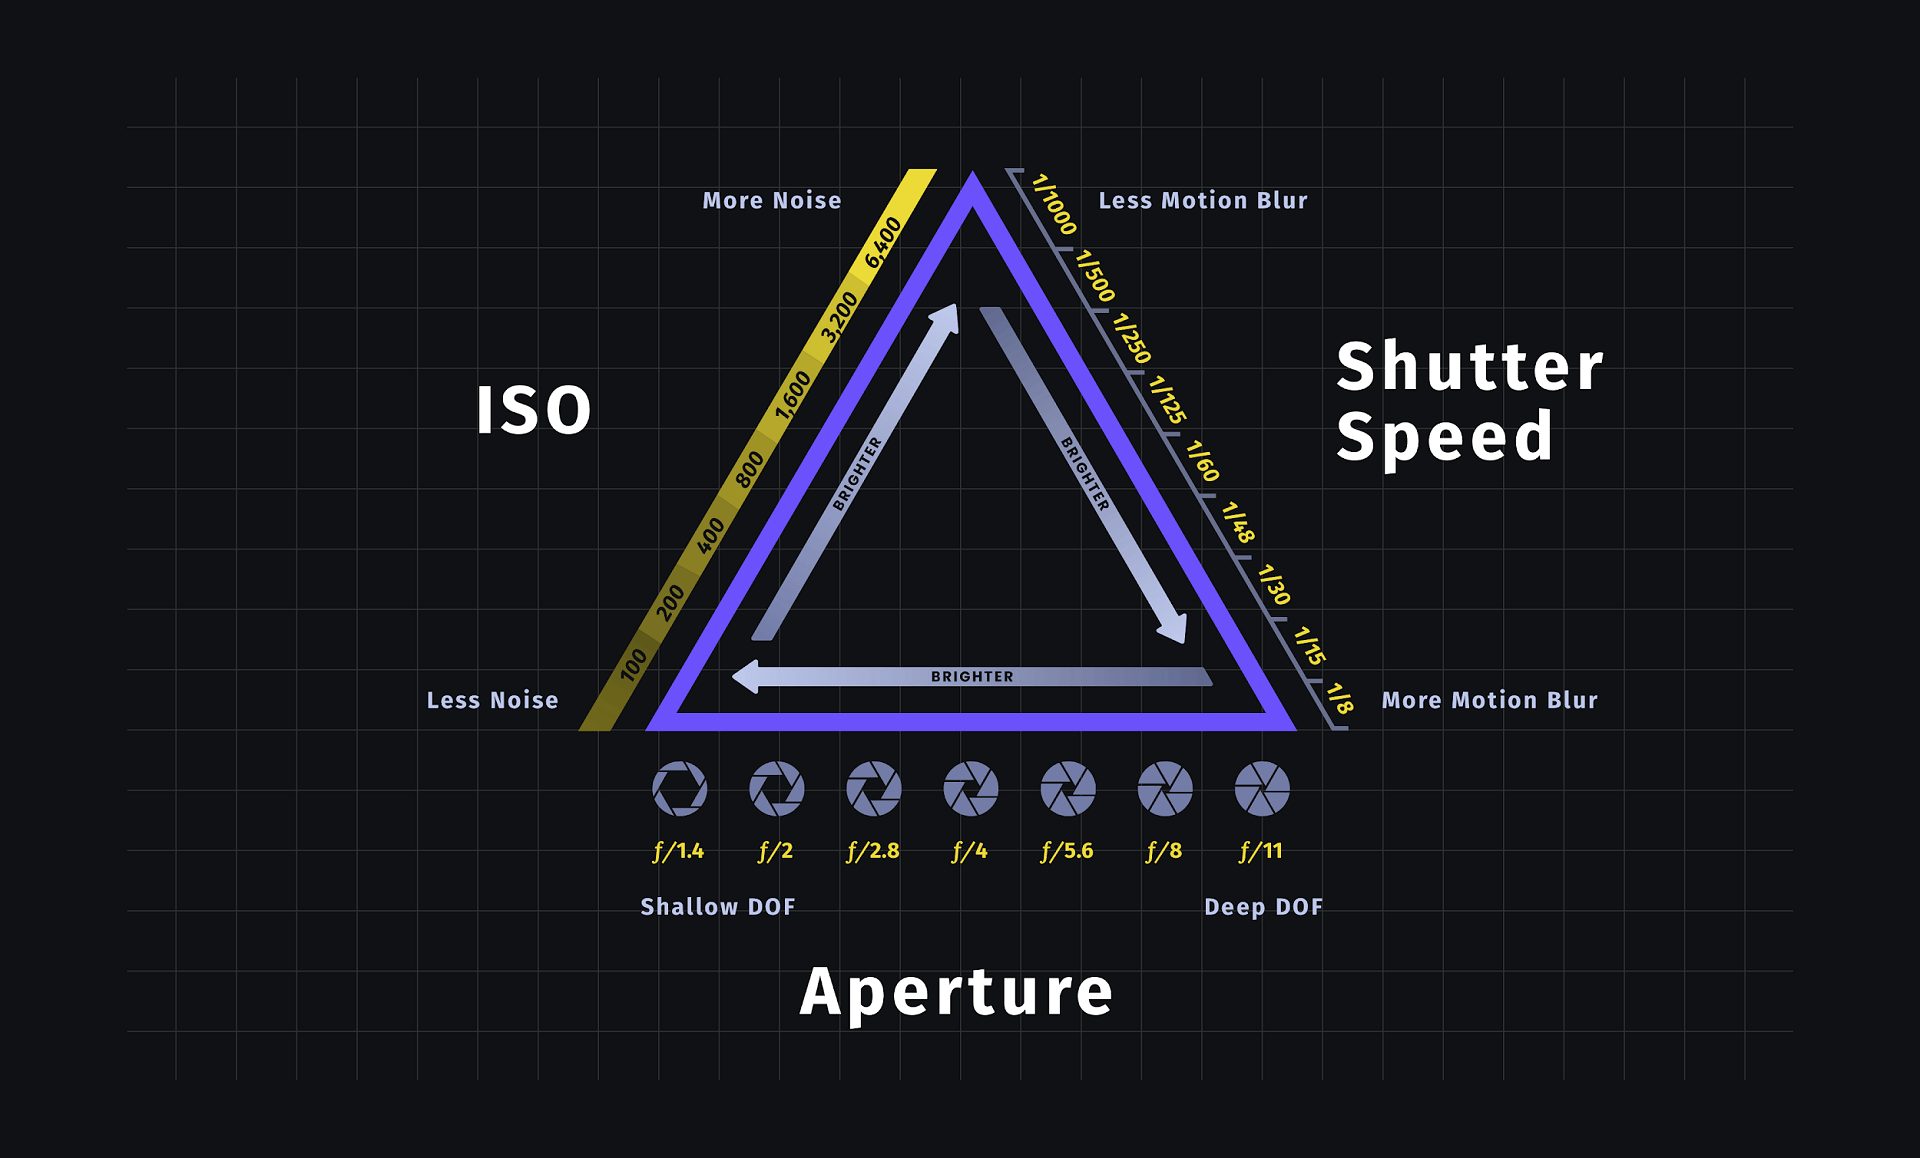
The exposure triangle refers to the three crucial components that determine the exposure of a photograph: aperture, shutter speed, and ISO. These elements work together to control the amount of light that reaches the camera sensor, ultimately affecting the brightness, sharpness, and overall quality of the image.
Aperture: The Gateway to Depth of Field
Aperture, often represented by an f-stop value, regulates the size of the lens opening. It determines the amount of light entering the camera and affects the depth of field, which refers to the area of the image that appears in focus. A wider aperture (smaller f-stop value) creates a shallow depth of field, blurring the background and isolating the subject. On the other hand, a narrower aperture (larger f-stop value) increases the depth of field, resulting in a sharper overall image.
Mastering the control of aperture allows photographers to artistically manipulate depth of field, emphasizing certain elements within the frame and creating captivating compositions.
Shutter Speed: Freezing or Blurring Motion
Shutter speed determines the duration for which the camera’s shutter remains open, exposing the camera sensor to light. It plays a crucial role in freezing or blurring motion within an image. A fast shutter speed (e.g., 1/1000th of a second) freezes action, allowing photographers to capture sharp and crisp images of moving subjects. Conversely, a slow shutter speed (e.g., 1/10th of a second) introduces motion blur, which can be used creatively to convey a sense of movement or capture dreamy long-exposure shots.
By skillfully adjusting the shutter speed, photographers can control the visual representation of motion, adding dynamic elements to their photographs.
ISO: Balancing Light Sensitivity and Image Quality
ISO measures the sensitivity of the camera sensor to light. A low ISO value (e.g., 100) produces images with minimal noise and high image quality. Conversely, a high ISO value (e.g., 3200) increases the sensor’s sensitivity, allowing for better performance in low-light situations but potentially introducing noise and reducing image quality.
Understanding how to balance ISO with aperture and shutter speed is crucial in achieving optimal exposure without sacrificing image quality. This knowledge empowers photographers to capture captivating photographs in various lighting conditions.
Mastering the Exposure Triangle: Practical Tips
Now that we have a solid understanding of the exposure triangle’s components, let’s explore some practical tips to master it and enhance our photographic skills:
- Experiment with Different Settings: Don’t be afraid to step out of your comfort zone and try different combinations of aperture, shutter speed, and ISO. This experimentation will help you understand how each setting affects the final image.
- Practice in Various Lighting Conditions: Different lighting situations require different exposure settings. Practice shooting in bright sunlight, low-light environments, and artificial lighting to familiarize yourself with adjusting the exposure triangle accordingly.
- Learn to Prioritize: Depending on the desired outcome, prioritize one element of the exposure triangle over the others. For example, if you want to freeze motion, set the shutter speed first and adjust the other settings accordingly.
- Use a Tripod: When shooting with slower shutter speeds, a tripod becomes essential to avoid camera shake and maintain image sharpness. Invest in a sturdy tripod for stable long-exposure shots.
- Review and Learn: After capturing images, review them critically to understand how the exposure triangle influenced the final outcome. Learn from your mistakes and successes to refine your skills further.
Frequently Asked Questions (FAQs)
1. What if my images are consistently overexposed or underexposed?
If your images are consistently overexposed (too bright) or underexposed (too dark), you can adjust the exposure compensation setting on your camera. This feature allows you to increase or decrease the overall exposure without manually changing the individual settings of the exposure triangle.
2. How can I achieve a shallow depth of field?
To achieve a shallow depth of field, you need to set a wider aperture (smaller f-stop value) on your camera. This will ensure that only a small portion of the image remains in focus while the rest becomes beautifully blurred.
3. What is the recommended ISO setting for low-light photography?
The recommended ISO setting for low-light photography depends on various factors, including the available light and desired image quality. However, starting with a higher ISO value (e.g., 800) can help capture enough light while minimizing potential noise.
4. Can I change the exposure triangle settings while shooting in manual mode?
Yes, shooting in manual mode gives you full control over the exposure triangle settings. You can adjust them as needed depending on the changing lighting conditions or desired creative effects.
Mastering the exposure triangle is a journey that requires practice, experimentation, and continuous learning. As you become more familiar with these fundamental principles, you’ll unlock the key to capturing truly captivating photographs.